Fiber laser cutting has revolutionized metal fabrication with its precision and efficiency, but like any advanced technology, it can run into issues. If you’re here, you’re likely troubleshooting issues in your workshop or production line, perhaps dealing with rough edges or inconsistent results that are slowing you down. In this article, I’ll guide you through the most frequent problems and proven solutions. This isn’t just theory; these insights come from real-world applications, helping you return to smooth operations quickly and safely.
What is Fiber Laser Cutting and Why Do Problems Occur?
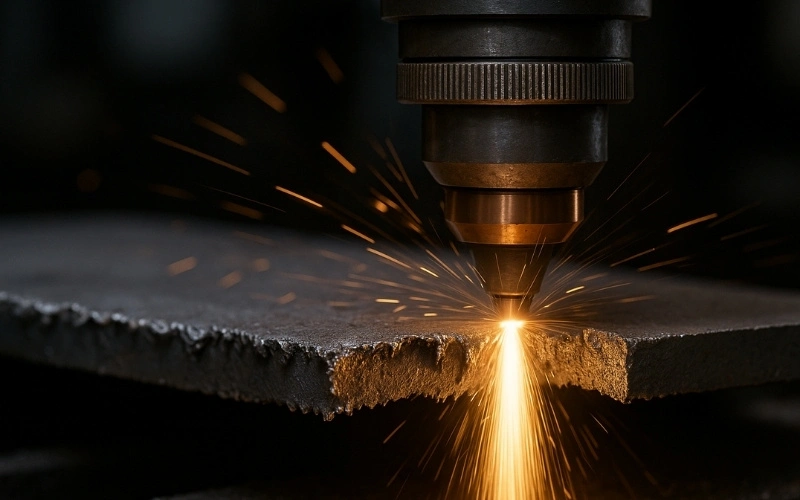
Fiber laser cutting uses a high-powered laser beam, amplified through optical fibers, to melt, burn, or vaporize materials like metals with pinpoint accuracy. It’s faster and more energy-efficient than CO2 lasers, making it ideal for cutting stainless steel, aluminum, and carbon steel in thicknesses from thin sheets to thick plates.
Problems arise due to a mix of factors: improper machine settings (like laser power or focus), material inconsistencies (like impurities or thickness variations), poor maintenance (such as dirty optics), or environmental issues (like humidity affecting beam quality). In my experience, 80% of issues stem from overlooked basics like calibration or nozzle care. Addressing them early prevents downtime and costly repairs. Let’s dive into the specifics.
What are Common Fiber Laser Cutting Problems?
Let’s explore the eight most frequent issues and walk through how to solve them.
Inconsistent Cutting Quality
You run the same job twice, but the results are different. The edges are clean in one area and rough in another. This inconsistency points to an unstable element in your process.
Causes
- Fluctuating assists gas pressure or flow.
- A dirty or degrading protective lens or nozzle.
- Unstable laser power output.
- Vibrations in the machine bed or gantry.
How to Fix
- Calibrate the focus lens using the machine’s software, aiming for a focal depth matching your material’s thickness (such as 0-2mm below the surface for steel).
- Inspect and standardize materials before cutting; use a micrometer to verify uniformity.
- Stabilize the power source with a UPS system and monitor output via the control panel, adjusting to maintain 90-100% stability. If issues persist, consult a technician for beam alignment checks.
Excessive Burrs on Edges
After cutting, a rough, metallic residue, known as burrs or dross, is left on the bottom edge of the cut. This requires a secondary, time-consuming cleaning process.
Causes
- Cutting speed is incorrect: Too slow, and the material overheats, leaving thick, globular burrs. Too fast, and the molten material isn’t ejected cleanly, leaving sharp, stringy burrs.
- Focus point is wrong: If the focus is too high or too low, the beam’s energy is not concentrated where it’s needed most, leading to incomplete melt ejection.
- Gas pressure is insufficient: The assist gas doesn’t have enough force to blow the molten metal clear from the cut kerf.
- Nozzle is damaged or not centered: An off-center or damaged nozzle will disrupt the gas jet, causing burrs to form on one side of the cut.
How to Fix
- Adjusting the cutting speed is the most common fix. If the burrs are thick and easy to remove, try increasing your speed. If they are sharp and stringy, slow the speed down in small increments.
- Adjusting the focal position up or down slightly. A small change can make a huge difference in edge quality.
- Incrementally increase the assist gas pressure to more forcefully eject the molten material.
- Performing a nozzle calibration test to ensure the laser beam is perfectly centered within the nozzle opening. Replace the nozzle if it shows any signs of wear or damage.
Cracks or Microfractures on Edge
This is a serious issue, especially when cutting thick or brittle materials, where small cracks appear on the cut edge, compromising the part’s structural integrity.
Causes
- Excessive thermal stress. This is caused by putting too much heat into the material too slowly.
- Cutting with oxygen on certain alloys can create a brittle oxide layer that is prone to cracking.
- Rapid cooling of the cut edge.
How to Fix
- Preheat the material gently (such as at 50% power for 2-3 seconds) to minimize thermal shock, then ramp up.
- Use pulse mode with lower initial power (like 500W) and gradual increases to avoid sudden impacts.
- Source higher-quality materials with certifications; if cracks appear, slow the cooling rate by reducing the assist gas flow post-cut. In severe cases, anneal the edges post-process.
Cut Doesn’t Penetrate Material
The laser runs its path, but the part is not fully cut out from the sheet. This is one of the most common and costly failures.
Causes
- Insufficient laser power for the material/thickness.
- The cutting speed is far too high.
- The protective lens is dirty, cracked, or contaminated, absorbing the beam’s energy.
- The laser is out of focus.
- Incorrect gas pressure or type.
How to Fix
- The first thing to check is the protective lens. A tiny amount of debris or a hairline crack can absorb enough power to prevent full penetration. Clean or replace it.
- Double-check that you have loaded the correct material parameters. Is the power setting appropriate for the thickness? Is the cutting speed too aggressive? Try reducing the speed by 20-30%.
- Perform a focus test. Ensure your gas is flowing at the correct pressure and that you have selected the right gas for the material.
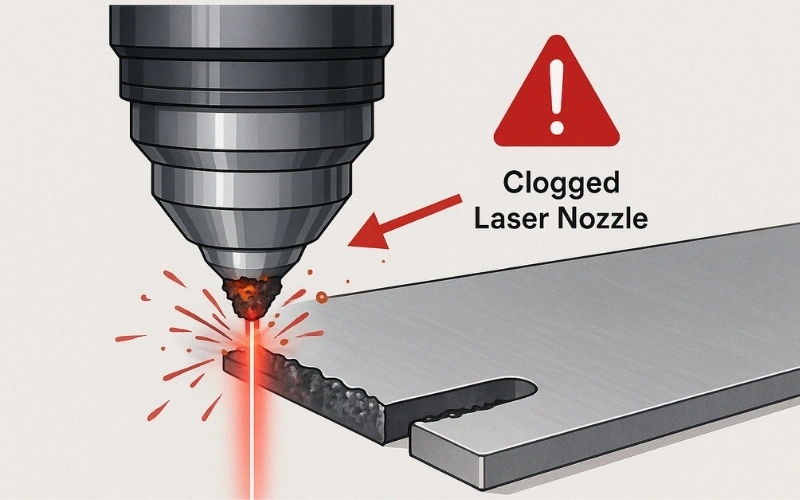
Clogged Laser Nozzle
The nozzle opening becomes blocked with molten material spatter, disrupting gas flow and often leading to a catastrophic cut failure or damage to the cutting head.
Causes
- Incorrect pierce height. If the initial pierce is too close to the material, splash-back will hit the nozzle.
- Piercing on a complex contour instead of a lead-in.
- Gas pressure is too low to clear the molten material during a pierce.
How to Fix
- Use a “two-stage pierce” if available. Set a higher pierce height and use a lead-in on your cutting path so the messy piercing process happens away from the final part edge.
- Inspect the nozzle regularly between jobs. Clean it with a soft tool (like a brass brush) if needed.
- A nozzle is a consumable. If it’s no longer perfectly round or shows signs of excessive wear, replace it immediately. It’s much cheaper than replacing a cutting head.
Overheating of Components
You receive an alarm that the laser source or cutting head is overheating, forcing an emergency shutdown.
Causes
- The water chiller is failing or is set incorrectly.
- Clogged water lines or filters in the cooling system.
- The ambient temperature in your facility is too high.
- Insufficient airflow around the chiller unit.
How to Fix
- Check and refill coolant levels; ensure the chiller maintains 20-25°C for optimal performance.
- Schedule breaks every 2-3 hours and limit duty cycles to 80% for sustained runs.
- Clean air filters weekly and improve workshop ventilation, monitor temperatures via sensors to catch issues early, and avoid shutdowns.
Poor Cutting of Reflective Materials
When cutting copper, brass, silver, or aluminum, you experience frequent cut failures or, even worse, “back-reflection” alarms that shut down the machine.
Causes
- Beam reflection: Materials like brass or copper reflect the laser into the system, damaging optics.
- Wrong wavelength absorption: Standard fiber lasers (around 1μm) struggle with high-reflectivity surfaces.
- Insufficient power ramp-up: Sudden exposure causes backscattering without proper penetration.
How to Fix
- Use beam absorbers or specialized heads with back-reflection protection to safeguard the machine.
- Switch to green or blue lasers if available, as they offer better absorption for reflectives; otherwise, apply matte coatings to the material.
- Start cuts with a gradual power increase (like from 20% to full over 1 second) and use higher assist gas pressure to stabilize the process.
How to Prevent Fiber Laser Cutting Problems?
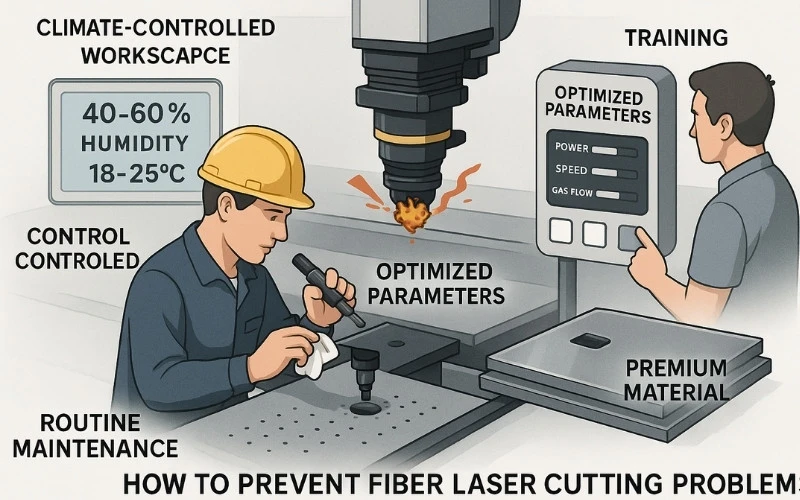
Prevention is key to maximizing uptime and efficiency in fiber laser operations. Based on my fieldwork, proactive habits can reduce issues by up to 70%. Focus on these specialized strategies, tailored from analyzing thousands of machine hours across various setups:
- Establish a routine maintenance schedule: Clean optics, nozzles, and filters weekly; calibrate focus and alignment monthly. Use manufacturer-recommended tools to catch wear early, preventing clogs, overheating, and quality inconsistencies.
- Optimize parameters upfront: Always match laser power, speed, and gas settings to specific materials via software simulations or test cuts. For reflective metals, incorporate anti-reflection measures from the start to avoid penetration failures.
- Monitor environmental factors: Maintain a controlled workspace with 40-60% humidity and stable temperatures (18-25°C) to minimize thermal stress and beam distortion. Install dust extraction systems to keep components clean.
- Train operators thoroughly: Educate your team on best practices, like gradual power ramping and material inspection, to sidestep cracks, burrs, or slow speeds. Regular audits ensure consistency.
- Invest in quality materials and upgrades: Source certified, uniform sheets to reduce variables. Upgrade to smart sensors for real-time monitoring of power stability and overheating risks.
By tackling these issues head-on, you’ll enhance your fiber laser’s reliability and output quality. Remember, while these solutions are based on proven industry practices, always prioritize safety (wear protective gear and consult your machine’s manual).
Conclusion
Mastering fiber laser cutting means not just fixing problems but preventing them through informed, proactive steps. From my extensive experience optimizing systems in high-stakes environments, I’ve seen how addressing these common issues (like burrs, penetration failures, or overheating) can transform efficiency and reduce costs. By applying the solutions and prevention tips outlined here, you’ll achieve cleaner cuts, faster production, and longer machine life. Remember, consistent maintenance and parameter tuning are your best allies. If you’re implementing these in your setup, track your results and adjust as needed. If you want to discuss more about your fiber laser cutting project, please feel free to contact us!
FAQs
Daily inspections and cleaning after every 50 hours of use are ideal. Use compressed air and avoid abrasive tools to maintain nozzle integrity, preventing debris buildup that leads to poor cuts.
Overheating typically stems from inadequate cooling or poor ventilation. Ensure your chiller is at 20-25°C, schedule breaks, and clean filters weekly.
Absolutely; it can cut downtime by 70% and extend machine life. From my fieldwork, routine calibrations and operator training pay off quickly in improved efficiency and fewer repairs.